Installing Debian with hard disk encryption and Windows dual boot
The goal of the instructions in this article is to install Debian on a hard disk that already has a functioning Windows 7 installation (with a master boot record – MBR). Here Debian Sid (a.k.a. Debian Unstable) –which is a rolling release distribution– is taken as an example but a regular Debian stable version can also be used (in that case skip the instructions in the Conversion to Debian Sid via Debian Testing section.
Hard disk encryption is set up, so that all the Linux partitions (except for the /boot partition) are encrypted.
An LVM container is used to hold the encrypted Linux partitions (i.e. swap, /, and /home) so that only one passphrase needs to be entered (otherwise a separate passphrase per encrypted partition would be required, which is not desirable).
Warning and disclaimer
Make sure to completely back up your existing Windows installation before attempting to follow the steps in this article. If you do not know how to back up your Windows installation or you have not made sure that your backup can be recovered then do not continue.
The instructions in this article should be followed only if you know what you're doing and you are sure that: you have a full backup of your system; you have verified it to be okay; you know how to restore it. Using the instructions in this article is at your own risk!
Getting Debian
A small installation image is downloaded, which installs Debian via the internet. The image used is the Small CD image: /debian-7.8.0-amd64-netinst.iso, which can be found on the following page: Installing Debian via the Internet.
Preparation of an USB stick with the Debian Installer
From a Linux command prompt the following command is used to write the Small CD image to a USB stick (BEWARE: using an incorrect device name may severely damage your system, quite likely beyond repair, so do not continue if you don't know what you're doing):
1dd if=debian-7.8.0-amd64-netinst.iso of=/dev/xxx bs=4M
(where the xxx must be replaced with the device name via which your USB stick is accessible; do not use the device name for a partition (these are typically followed by a number, e.g. xxx1) but use the device name for the whole device, so that the partition table on the USB stick can be written as well).
Starting the Debian Installer by booting from the USB stick
Reboot your computer and if required invoke the BIOS menu that allows you to select the USB stick as a boot device.
If your computer has booted from the USB stick then you should get a screen as follows:

Debian Installation
Select Install from the menu to start the installation. Go through the regular screens for language, location, locales and keyboard (keymap) selection. Next go through the network set up, root password, set up users and passwords screens.
Now you should get the Partition disks screen (BEWARE: do not use any of the Guided partition options), as follows:
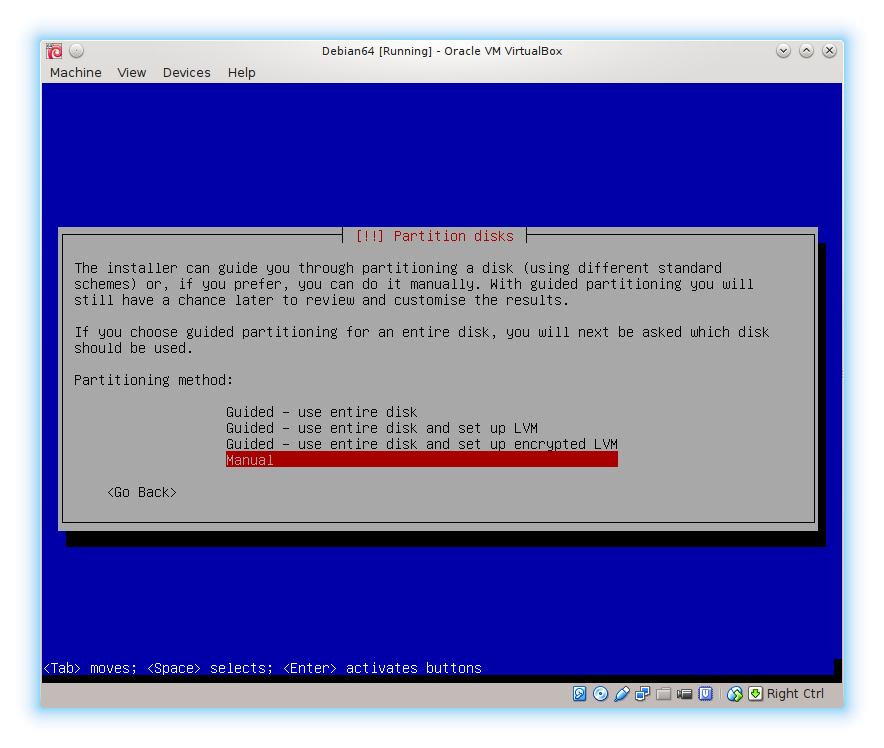
Partition disks
In the Partition disks screen make sure to select the Manual option and hit Enter. (Beware: the Guided options will overwrite the partitions of your existing Windows installation, quite likely beyond repair, so do not continue if you don't know what you're doing).
Now you'll get the Manual partitioning screen, as follows:

In this screen make sure to NOT SELECT the Guided partitioning option! (Beware: the Guided options will overwrite the partitions of your existing Windows installation, quite likely beyond repair, so do not continue if you don't know what you're doing).
Instead select the line that shows FREE SPACE, which is i.e. the remaining free space on your hard drive and hit Enter.
Creating the unencrypted boot partition
You should now get a windows as shown below:

In this window select the Create a new partition option and hit Enter, which results in the following window:

Change the text in the input field so that the boot partition size is set to 512 MB (which should be enough for a boot partition; change it to your desired value if you disagree).
Select Continue (or hit Enter), which results in the following window:

Select the Primary type and hit Enter, which results in the following window:

Here select Beginning and hit Enter, which results in the following Partition Settings window:

Here under Use as, select Ext2 file system; under Mount point select boot; under Label type boot; under Bootable flag set the flag to on.
When done with that select Done setting up the partition and hit Enter.
Creating the encrypted volume partition
You'll now be back in the manual partitioning screen, as follows:

Make sure to select Configure encrypted volumes and hit Enter, which results in the following window:

Select Yes to write the current partition table. The following Create encrypted volumes window should appear:

Select Create encrypted volumes and hit Enter, which should result in the following window:

In the select devices window make sure to select the line marked with FREE SPACE. Navigate to the line via the arrow up- and down buttons and use the space bar to select. Next use the Tab key to navigate to the Continue button and hit Enter to continue.
The partition settings window is displayed next, as follows:

Leave the settings as is (unless you require specific settings) and select the Done setting up the partition option and hit Enter. Confirm with Yes in the confirmation screen that is shown. You'll now be back in the Create encrypted volumes window, where you can select Finish and hit Enter.
Erasing the encrypted volume partition
Now you'll be shown a confirmation window, which asks you if you really want to erase the data on the encrypted volume partition. It is advised to do so because otherwise unallocated space on the volume can be distinguished from space in use, reducing security.

Do however note that erasing takes a very long time (it took around 20 hours for my 400 GB partition). If you select Yes then sit back and wait until it's done; if you select No then the erasing step is simply skipped.
Either way, you'll now be shown the Encryption passphrase window, as follows:

Here enter a strong passphrase to make sure that your encrypted volume is properly protected. Hit Enter to continue and reenter your passphrase, again hitting Enter to continue.
Setting up an LVM container
You'll now be back in the manual partitioning screen, as follows:

Select the partition #1 under Encrypted volume and hit Enter. This results in the following partition settings window:

Now select the line with Use as and in the window that is now shown, set the partition type to physical volume for LVM and hit Enter.Now Use as is set to physical volume for LVM and Done setting up the partition can be selected to continue.
The partition settings window is shown again, with the encrypted partition #1 now marked as lvm.

Now select the Configure the Logical Volume Manager option, hit Enter and in the confirmation screen select Yes. The create volume group window is now shown:

Select the Create volume group option and hit Enter. In the window that is now shown type the volume group name (e.g. cryptovolume). Hit Enter to continue, which results in the select device for volume group window:

Here make sure to select the encrypted partition (so not the Windows or Linux boot partition). Use the arrow keys to navigate to the encrypted partition and the space bar to select it. Next use the Tab key to navigate to the Continue button and hit Enter to continue. The following window is shown:

Here the Create logical volume option can be used to subsequently create the logical volumes for respectively: swap, / and /home partitions (omit /home if you don't require a separate home partition). When asked for a name for a logical volume, use one corresponding with its function (e.g. swap, root and home).
Concerning the partition sizes: these depend on the available space on your hard drive. For my system I've set the sizes to: 10 GB for swap, 41 GB for / and the remainder for /home.
When you're done select Finish to continue. This results in a window similar to this one:

Do note that I've changed the Use as (i.e. the partition type), the mount point and the label for each of the logical volumes that were created in the previous step. You can do this by selecting the partition under each logical volume that you've created in the previous step.
When done setting up the partition type (Use as), mount point and label for each of the partitions for the logical volumes (in my example there are three: swap, / and /home) select Finish partitioning and write changes to disk to conclude the partioning step.
A confirmation window will be presented. Make sure everything is correct and select Yes to confirm and continue. The partitions will be formatted and the base system is installed (takes a while).
Download of additional files
In the screens that follows select an appropriate mirror near your geographical location and supply proxy information if required.
Next additional files will be downloaded from the internet (takes a while, depending on your connection speed).

When the download is complete you can specify in the participate in package usage survey screen whether you want to participate or not.
Software selection
In the software selection screen deselect all packages.

It's better to have a system as minimal as possible for the conversion from Debian Stable to Debian Sid. Additional packages can be installed. If you plan to use Debian Stable (so you don't want to use Testing or Sid) then you can select the packages you require here and skip the Conversion to Debian Sid via Debian Testing step.
Use the arrow up- and down keys to navigate and the space key to select. When done, use the Tab key to navigate to the Continue button and hit Enter.
Again files will be downloaded from the internet (takes a while, depending on your connection speed).
Concluding the installation and rebooting
Install the GRUB bootloader to the master boot record (MBR).

After a while reboot instructions appear and the installation is done. Reboot into the installed system. The system boots:

Enter the passphrase, press Enter to continue (a single passphrase unlocks all the Linux partitions). The system continues booting and a login prompt is presented. Login as the user that was created during installation and do a sudo -i to get a root prompt, as follows:

Conversion to Debian Sid via Debian Testing
As mentioned on the Debian Sid Install FAQ page you must go via Debian Testing to get to Debian Unstable (a.k.a. Sid). BEWARE: Once your system is converted to Debian Sid (or Debian Testing) there is no easy way back, so think about this again and reconsider if you do not want a regular Debian Stable installation (if so then do not follow the instructions in this section).
Do an apt-get update, an apt-get upgrade and an apt-get dist-upgrade to get your Debian Stable fully up to date. Reboot to conclude and re-login, etc.
Now edit /etc/apt/sources.list and replace all occurences of wheezy to testing (except for the cdrom lines). Note the lowercase in testing.
When done editing do the following: an apt-get update and an apt-get upgrade; reboot, re-login, etc.; do an apt-get dist-upgrade and again reboot, re-login, etc.

When asked if services must be restarted automatically during the upgrade or dist-upgrade, select yes.
When the upgrading has finished your system is at Debian Testing level. To get to Debian Sid (a.k.a. Unstable) edit /etc/apt/sources.list and replace all occurences of testing with unstable (except for the cdrom lines and the testing-updates lines, which do not apply to Sid, so comment these out). Note the lowercase in testing and unstable. While you're at it, also add contrib non-free to the lines.

When done editing do the following: an apt-get update and an apt-get upgrade; reboot, re-login, etc.; do an apt-get dist-upgrade and again reboot, re-login, etc.

When the upgrading has finished your system is at Debian Sid level and you can commence to further set up your system (e.g. to install the KDE desktop).
(Optional) Install KDE desktop
Follow instructions at the Debian KDE page. I installed the kde-plasma-desktop package for a minimal KDE desktop and added additional packages later (such as the kdenetwork package).